Building to Mobile - Unity
- iOS
- Android
This article will walk you through building your Skillz Unity project to Android and iOS.
1. Configure Game for Skillz
Select the Skillz > Settings menu item to bring up the Skillz Settings window:

Set your Game ID, the environment (Sandbox or Production), and the orientation for your game.
Select environment Sandbox for development and testing. Come back here and switch to Production when readying the build for publishing to the app stores.
Please ensure to select the correct orientation if you plan to distribute your game on Android. This setting is important for ensuring your game renders in the correct orientation for gameplay. For instance, if the scene for your main menu is designed for Portrait mode, but your game scene is designed for Landscape, the orientation setting should be set to Landscape.
Additionally, you can choose if users are allowed to exit the Skillz UI via its sidebar menu.
2. Resolve Dependencies
- iOS
- Android
Configure External Dependency Manager
Skillz for Unity is bundled with the External Dependency Manager plugin. This plugin will resolve transitive dependencies between multiple libraries for iOS. Preliminary configuration is needed:
- Select the
Assets > External Dependency Manager > iOS Resolver > Settingsmenu item. - Click the
Reset to Defaultsbutton as a precaution. - Click the
OKbutton to save your changes.

Install CocoaPods
The External Dependency Manager can install CocoaPods for you, if it is not already installed:
- Select
Assets > External Dependency Manager > iOS Resolver > Install Cocoapods - Click
OKin the pop-up confirming installation was successful.
If the installation fails see known issue: CocoaPods Installation Fails.
Configure External Dependency Manager
Skillz for Unity is bundled with the External Dependency Manager plugin. This plugin will resolve transitive dependencies between multiple libraries (that support it) for Android, such as Skillz and Firebase. However, preliminary configuration is needed:
- Select the
Assets > External Dependency Manager > Android Resolver > Settingsmenu item. - Click the
Reset to Defaultsbutton as a precaution. - Uncheck the
Enable Auto-Resolutionoption. - Make sure the "Patch mainTemplate.gradle" option is checked.
- By selecting this option, the External Dependency Manager will modify
Assets/Plugins/Android/mainTemplate.gradlewith the list of resolved of resolved dependencies. - The final
build.gradlefile in an exported Android Studio project will list these dependencies. - This approach is recommended by Google. Otherwise, the plugin will download the resolved dependencies as JARs/AARs.
- By selecting this option, the External Dependency Manager will modify
- Check the
Use Jetifieroption. Skillz requires the new AndroidX Support Libraries, instead of the original Android Support Libraries. Checking the Jetifier option ensures that all libraries that depend on the original Android Support Libraries are migrated to the equivalent AndroidX ones. - Click the
OKbutton to save your changes.

Resolve Android Dependencies
With the External Dependency Manager configured, it's time to resolve your Unity project's Android dependencies. Select Assets > External Dependency Manager > Android Resolver > Resolve. A message box will display after resolution has completed.
Afterwards, verify that mainTemplate.gradle was modified to ensure that all resolved dependencies are listed.
The dependencies section should look similar to this snippet before modification:
dependencies {
    implementation ("com.skillz.sdk:skillz-sdk-android:<sdk_version_string>")
    {
        transitive = false
    }
**DEPS**
}
And it should look similar to this snippet after modification:
dependencies {
    implementation ("com.skillz.sdk:skillz-sdk-android:<sdk_version_string>")
    {
        transitive = false
    }
// Android Resolver Dependencies Start
    implementation 'androidx.appcompat:appcompat:1.3.1' // Assets/Skillz/Editor/SkillzDependencies.xml:14
    implementation 'androidx.constraintlayout:constraintlayout:1.1.3' // Assets/Skillz/Editor/SkillzDependencies.xml:36

    // Etc...
If the file did not appear to be changed, you may have to save your project, reopen it, and select the Assets > External Dependency Manager > Android Resolver > Force Resolve menu item.
3. Build and Run
Unity Player Configuration
- iOS
- Android
Player Settings
-
In Unity select
File > Build Settings.... -
In the lower left click
Player Settings....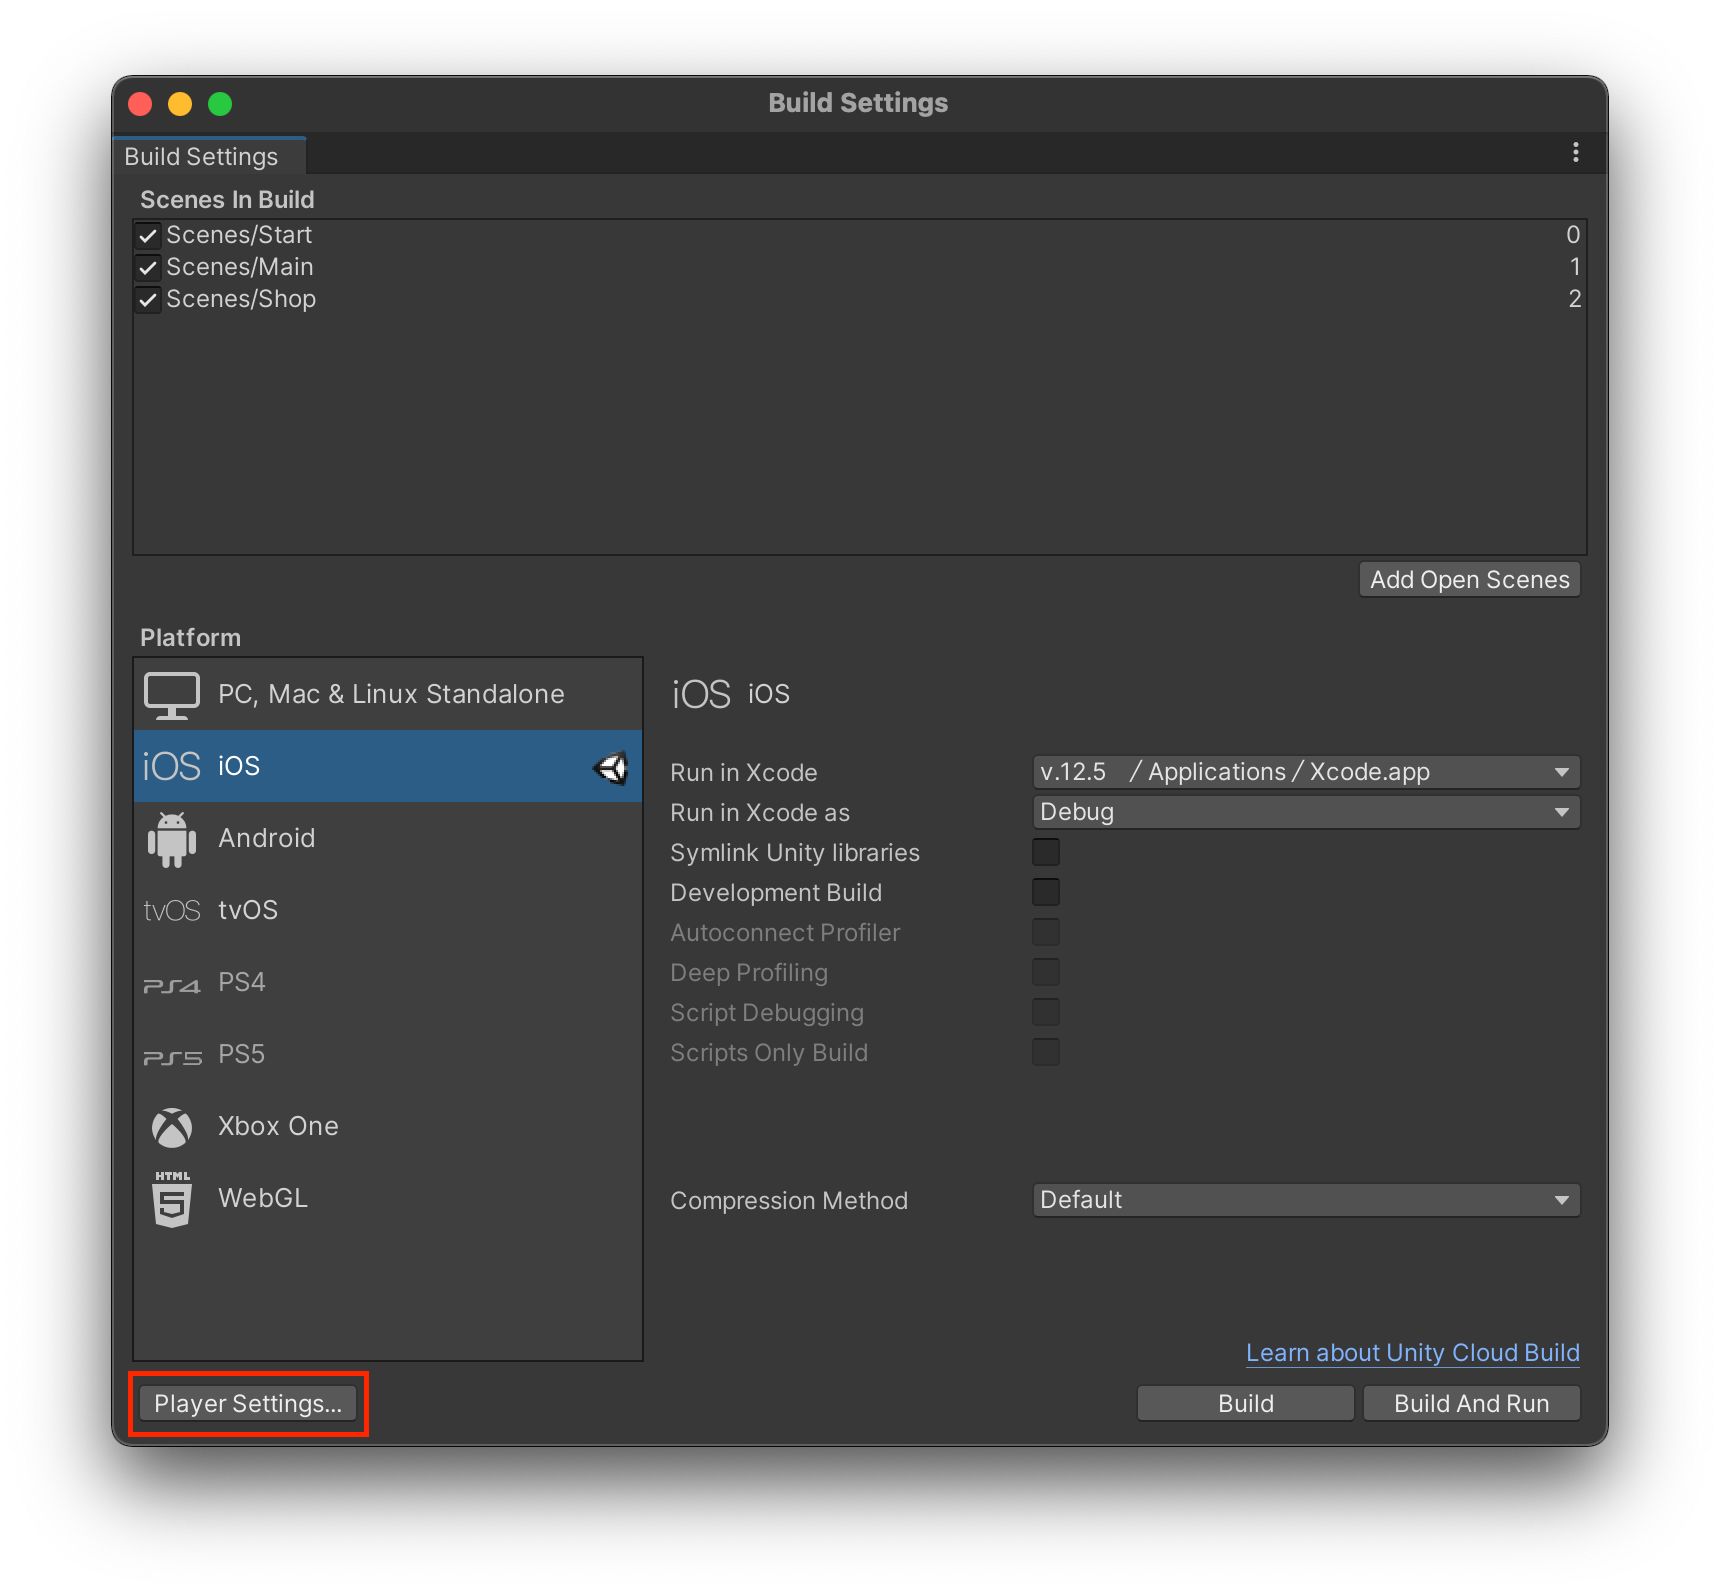
-
Select
Playerfrom the sidebar and click on theiOStab. -
Under
Settings for iOS, expandResolution and Presentation:- Select
Resolution Scaling Mode: Fixed DPI - Set
Target DPIto328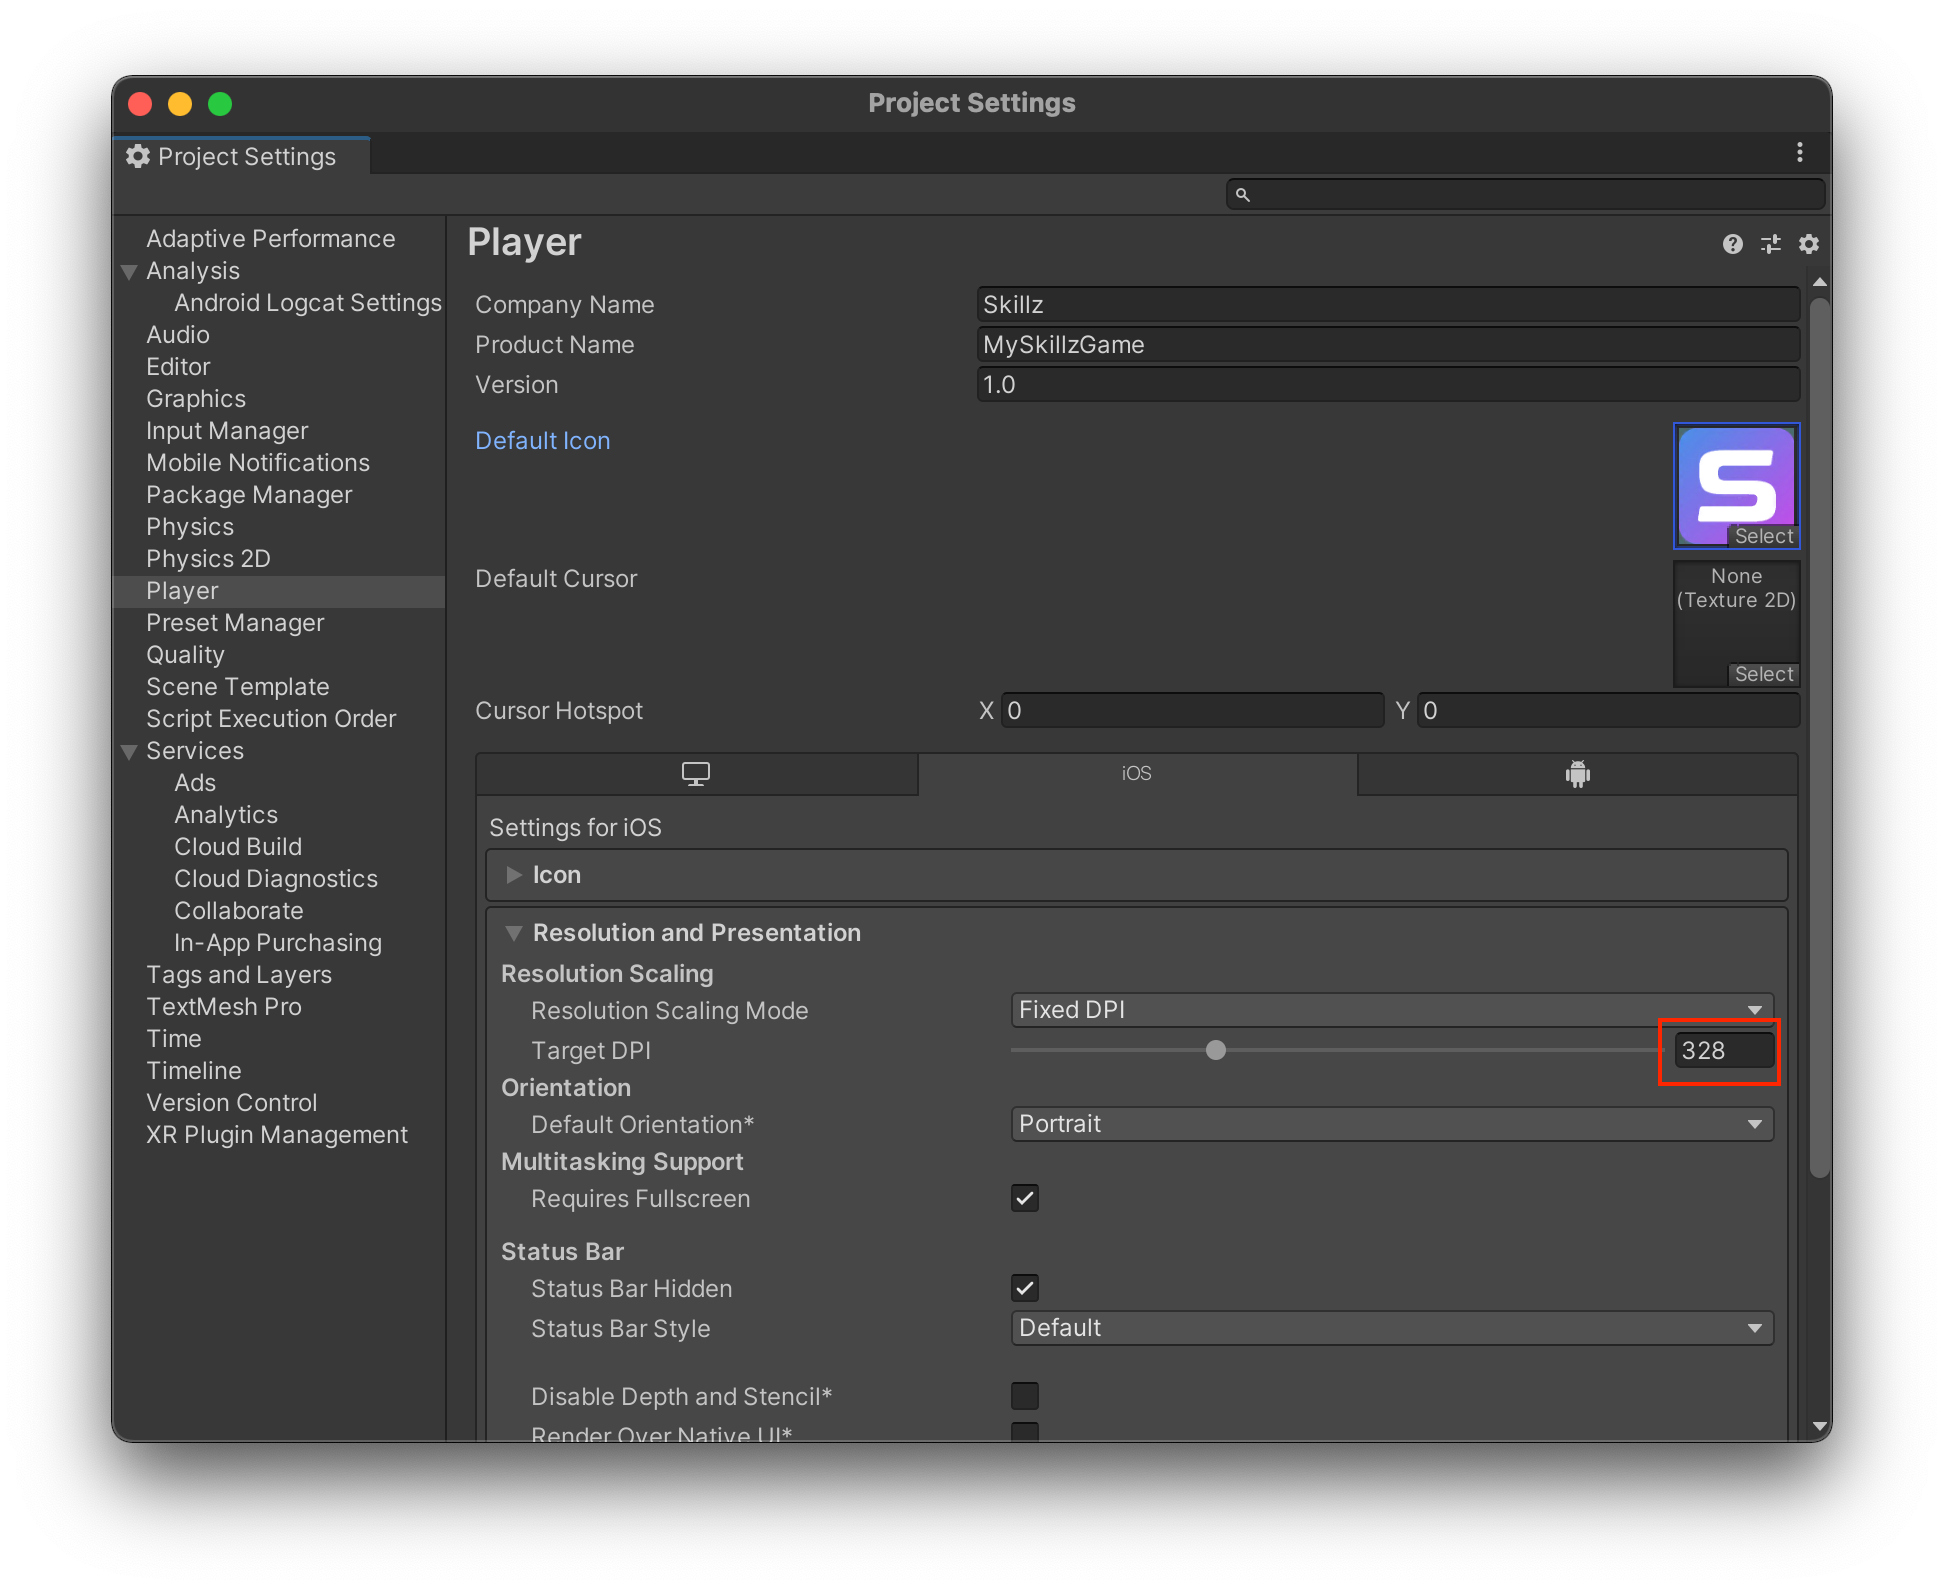
- Select
-
Under
Settings for iOS, expandOther Settings:-
Deselect
Metal Write-Only Backbuffer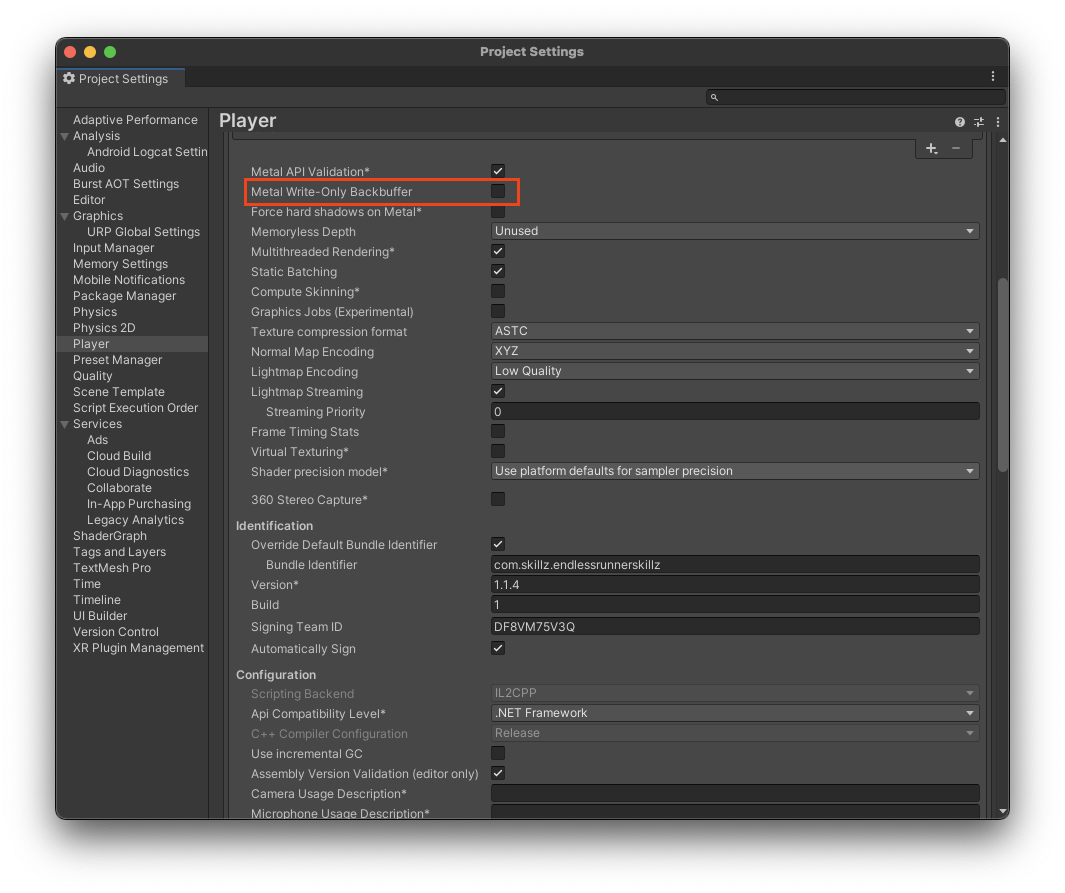
-
Deselect
Allow downloads over HTTP (nonsecure)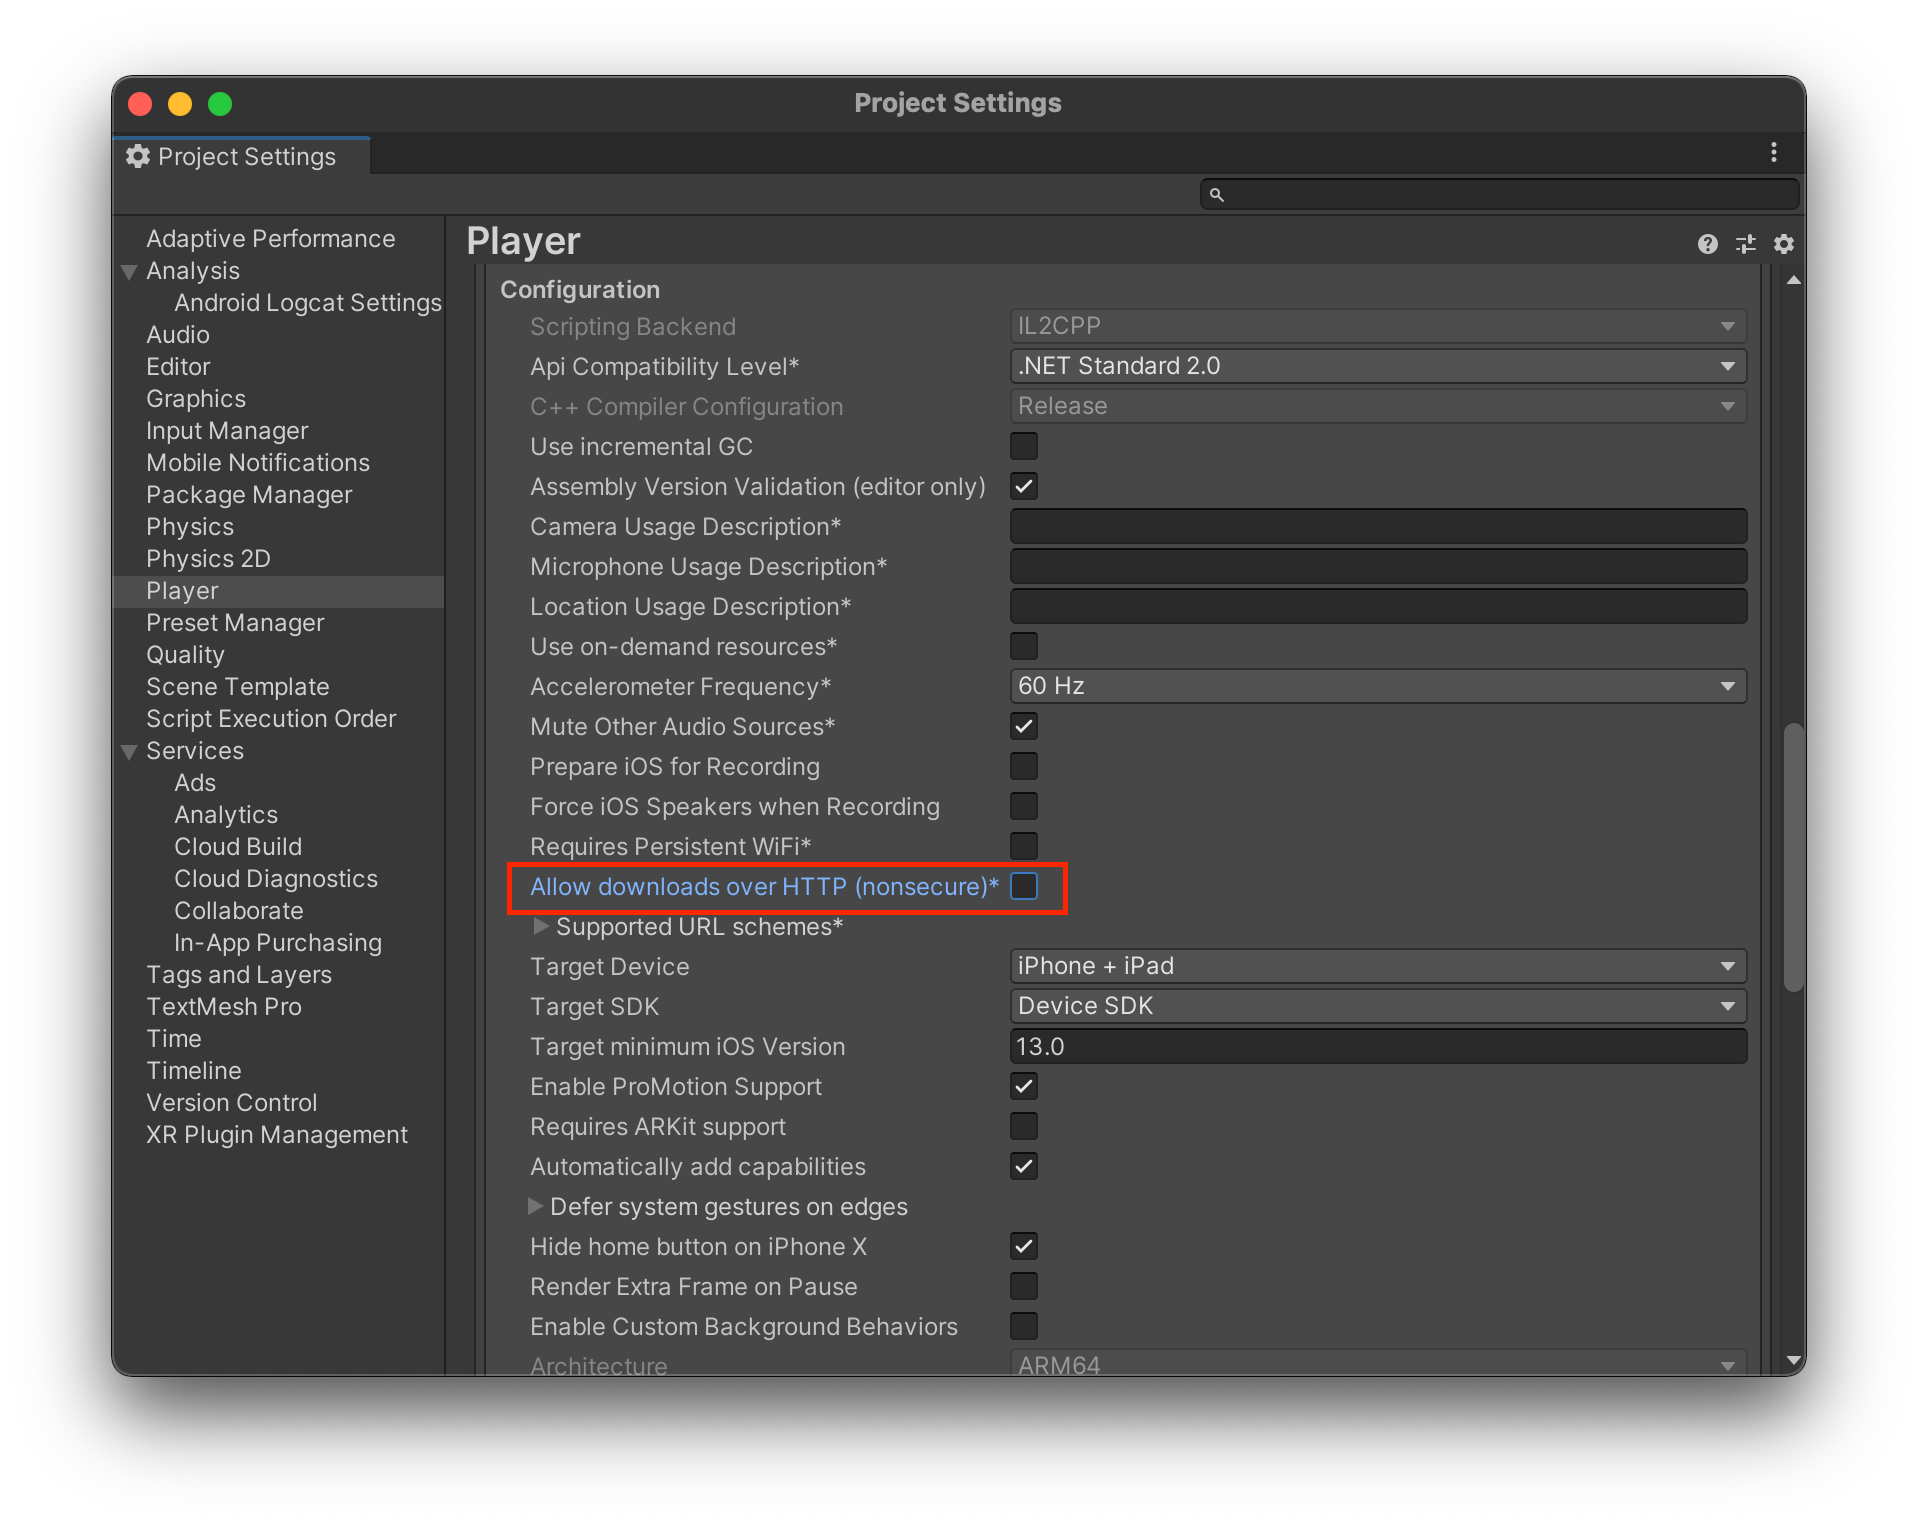
-
-
Close the window. It will automatically save your new settings.
Build Settings
- In Unity select
File > Build Settings... - If Platform selection is not
iOS, selectiOSand clickSwitch Platform.
Player Settings
-
In Unity select
File > Build Settings.... -
In the lower left click
Player Settings.... -
Select
Playerfrom the sidebar and click on theAndroidtab. -
Under
Settings for Android, expandResolution and Presentation:- Select
Resolution Scaling Mode: Fixed DPI - Set
Target DPIto328
- Select
-
Select
Playerfrom the left navigation and expandOther Settings:- Select
Scripting Backend: IL2CPP - Under
Target ArchitecturescheckARMv7andARM64to ensure support for 32-bit and 64-bit Android devices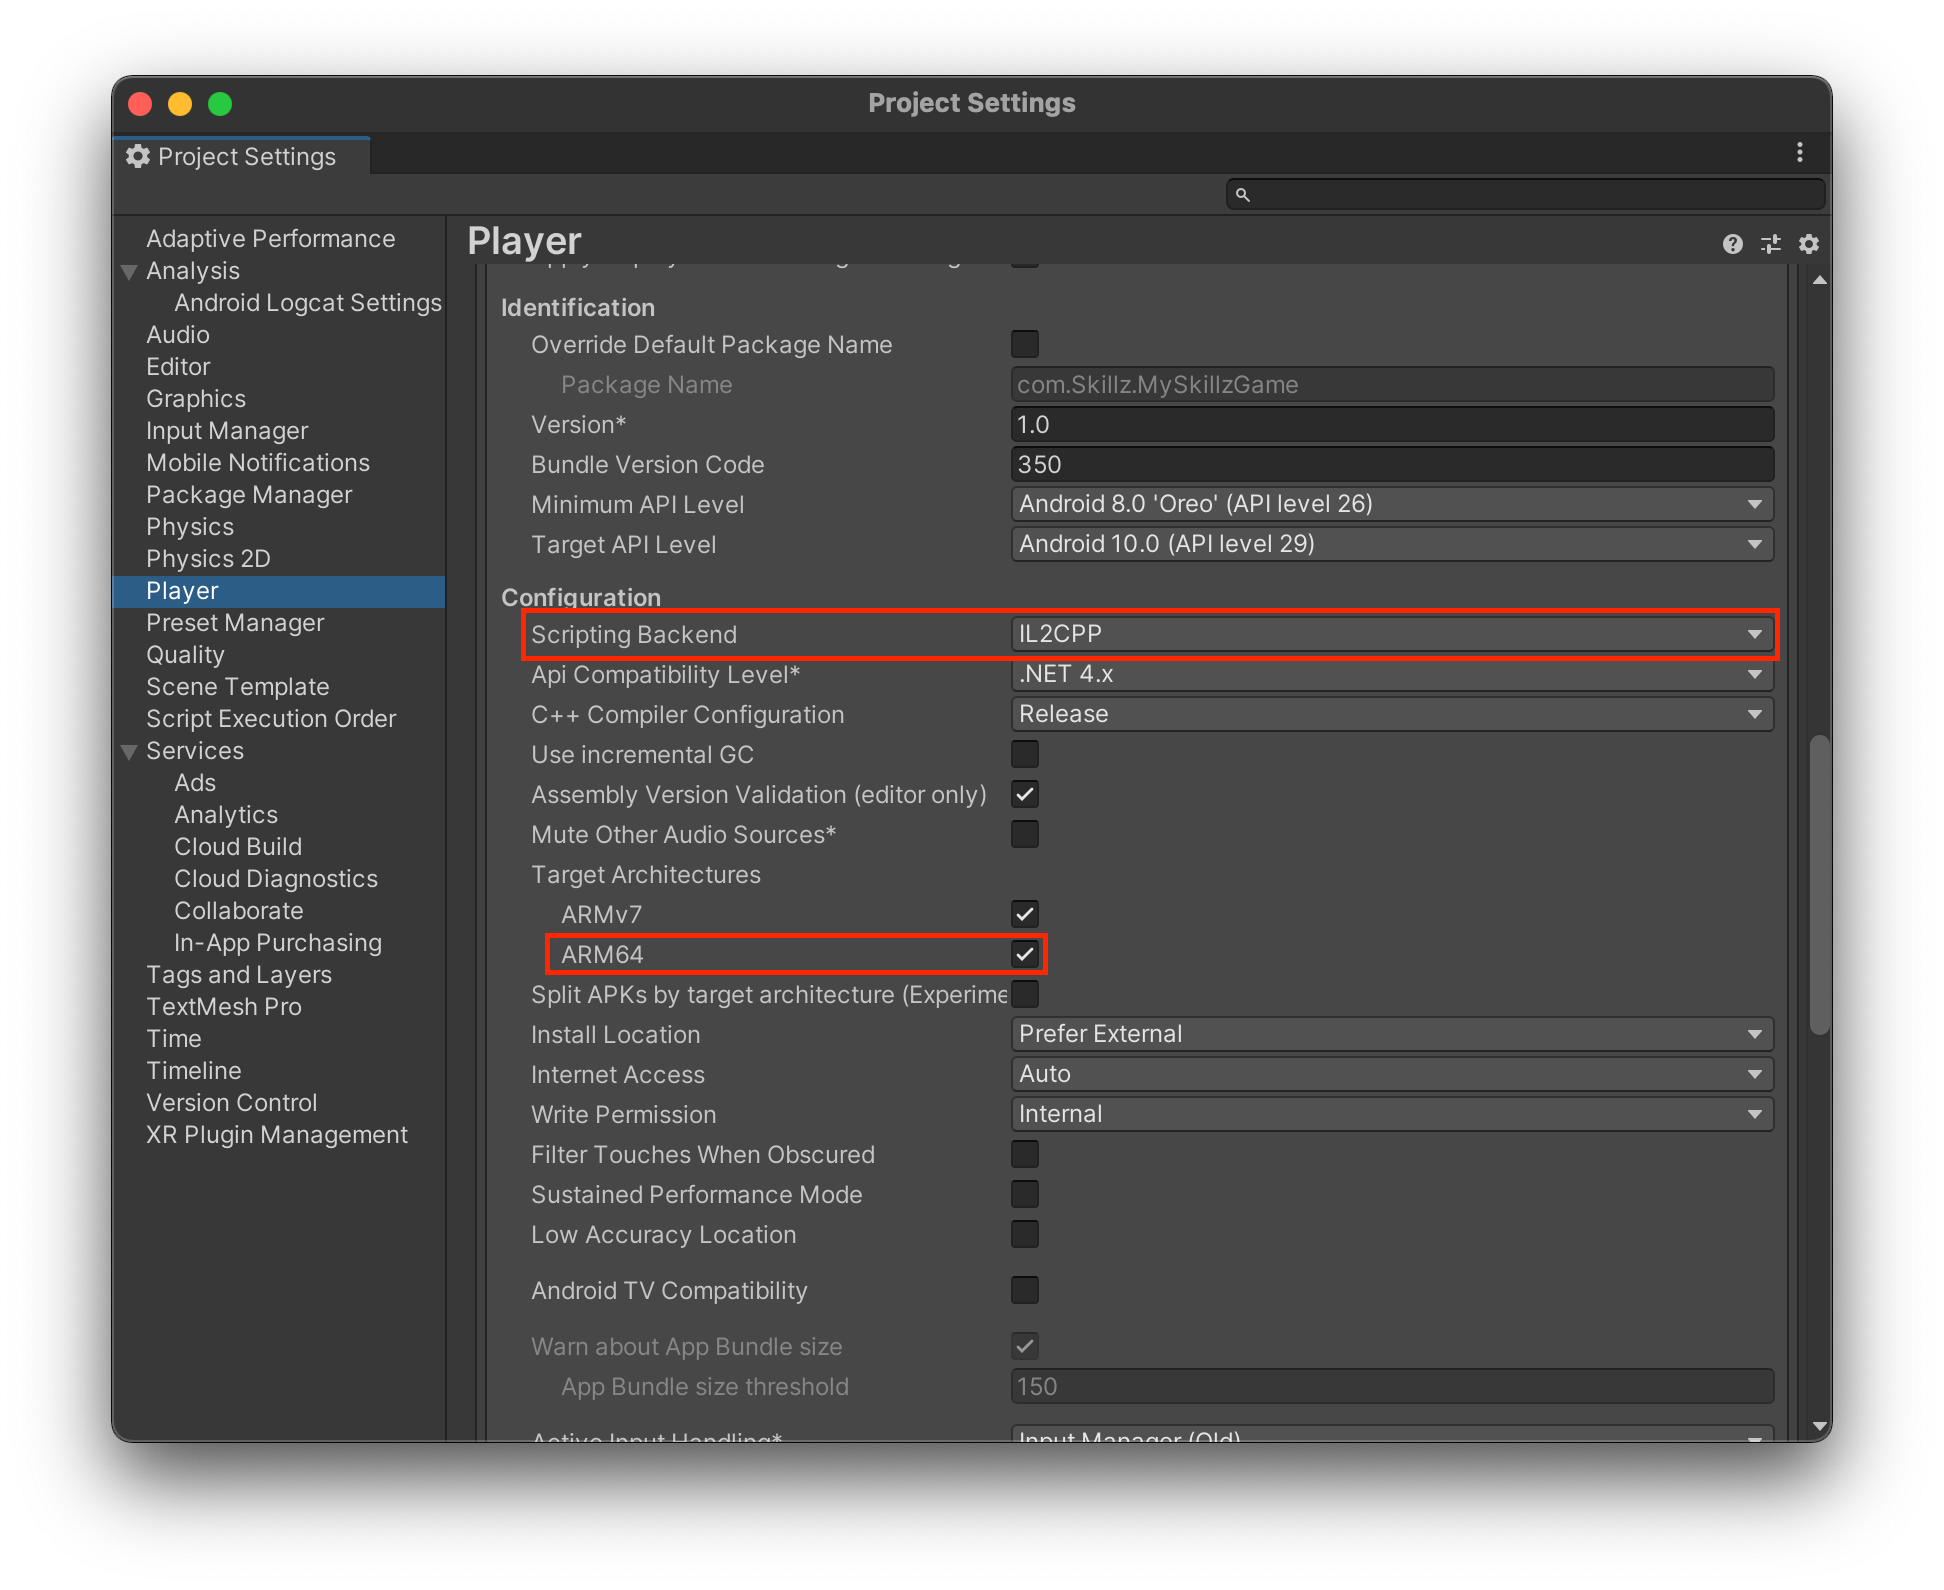
- Select
-
Close the window. It will automatically save your new settings.
Build Settings
- In Unity select
File > Build Settings.... - If Platform selection is not
Android, selectAndroidand clickSwitch Platform. - Check
Export Projectif you would like to generate an Android Studio project versus Android App Bundle or APK. - In the lower left click
Player Settings....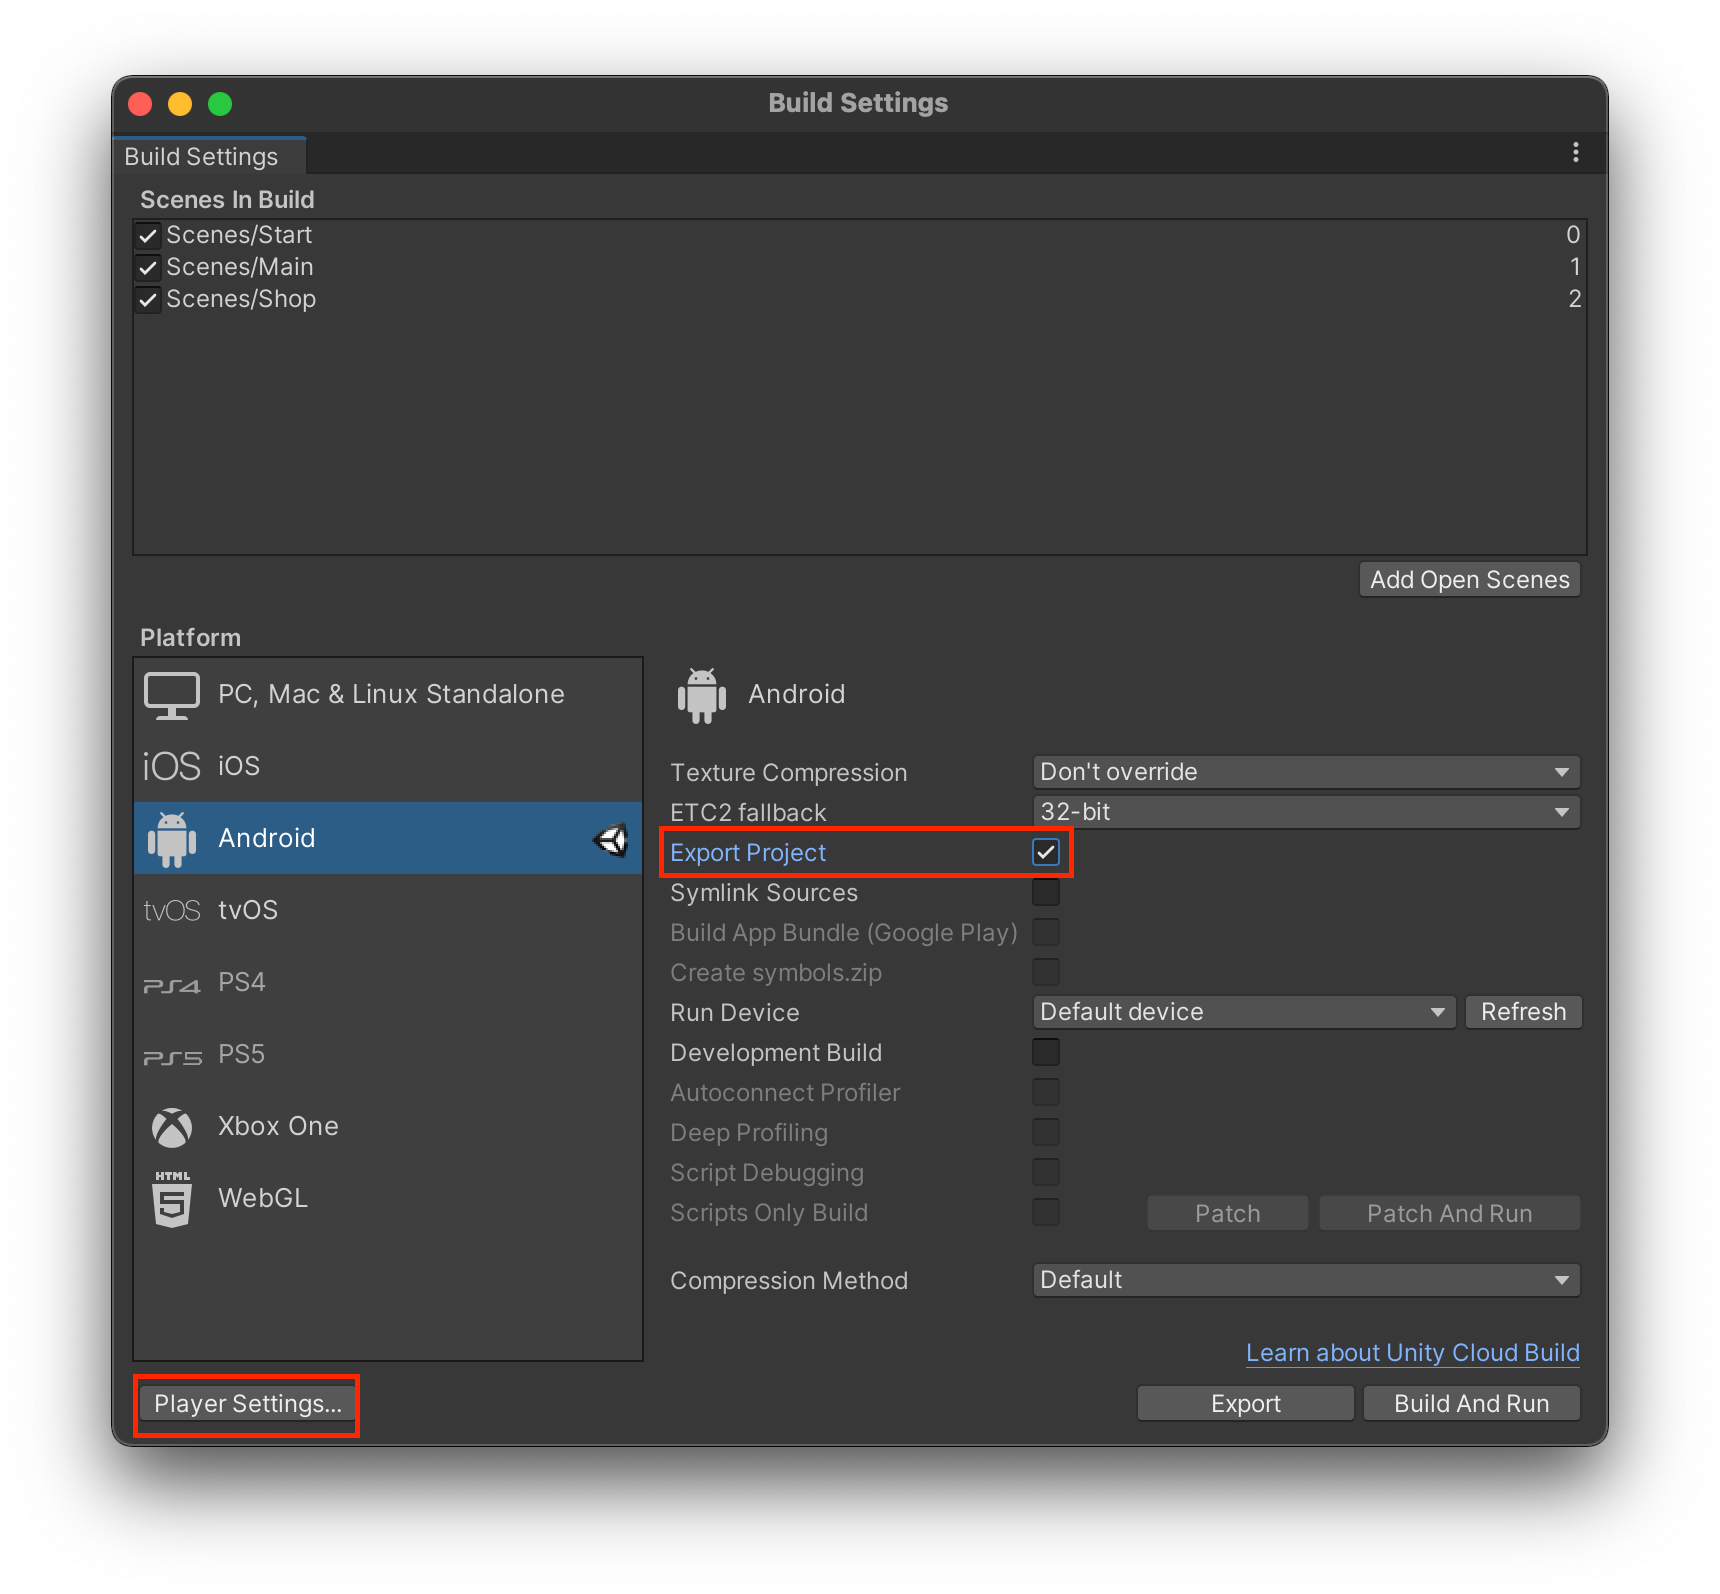
Initiate Build
- iOS
- Android
- Click Build to initiate the build process.
- When Prompted, enter a destination to save the XCode project.
- When complete, the project can be opened by double-clicking the
*.xcworkspacefile. Do not open the project using the*.xcodeprojfile, as it will not properly initialize the CocoaPod dependencies. - In Xocde, choose a profile for your project, connect an iOS device, then run your project.
if a *.xcworkspace file does not appear, make sure you have Cocoapods installed. If this issue persists, try the workaround in the known Issues Page.
- Click Export to initiate the build process.
- When Prompted, enter a destination to save the Android Studio project.
- When Complete, open the project in Android Studio.
- In Android Studio, connect an Android device, then run your Android Studio project.
Versions 29.x+ of the SDK require Gradle 6.5+, while Unity comes with Gradle 6.1.1. Android Studio should direct you to upgrade Gradle when you import the project. If you wish to build the apk from Unity directly, you can find directions on updating Unity's version of gradle here
Firebase
If you plan on adding Firebase to your Unity project, we recommend you use Unity Firebase 8.9.0, as it has been tested with the Skillz SDK.