Upgrading the SDK
Version 29.x Upgrade
This document is for developers who have previously integrated v27.x or v28.x of the Skillz SDK. To integrate for the first time, please follow the standard instructions.
- Unity
- iOS
- Android
Before You Upgrade
The Skillz SDK is now integrated using CocoaPods for iOS. This dependency manager greatly streamlines integration and configuration of the Skillz SDK. Go here for more information
Due to Android being built with Android SDK 30, your app will ask for permissions at runtime, rather than at install time. Unity typically operates by asking for all possible permissions on the first launch of your app, and this can be overwhelming/off-putting to your users. Refer to these instructions on how to prompt for only necessary permissions at runtime.
Instructions
As a best practice back up your existing project prior to upgrading. The upgrade steps require you to delete existing files and directories.
Delete the Assets/Skillz folder in Unity
Make sure to save any custom code you wrote in these Skillz files for safe keeping. In your Unity project, delete the Assets/Skillz/ folder in your Unity project.
Delete the Assets/ExternalDependencyManager folder in Unity
The Google Play Services Resolver has been renamed to the External Dependency Manager for Unity (EDM4U). If you have a PlayServicesResolver and/or ExternalDependencyManager directory in your project you should delete this directory before upgrading and installing the Skillz SDK Unity package.
Import the New Unity Package
With your Unity project open, double-click on the Unity package, skillz_unity-{version}.unitypackage, found inside the downloaded SDK archive. A dialog will pop up with a list of files to import. Make sure all files are checked and click "OK".
Disable Registry Addition
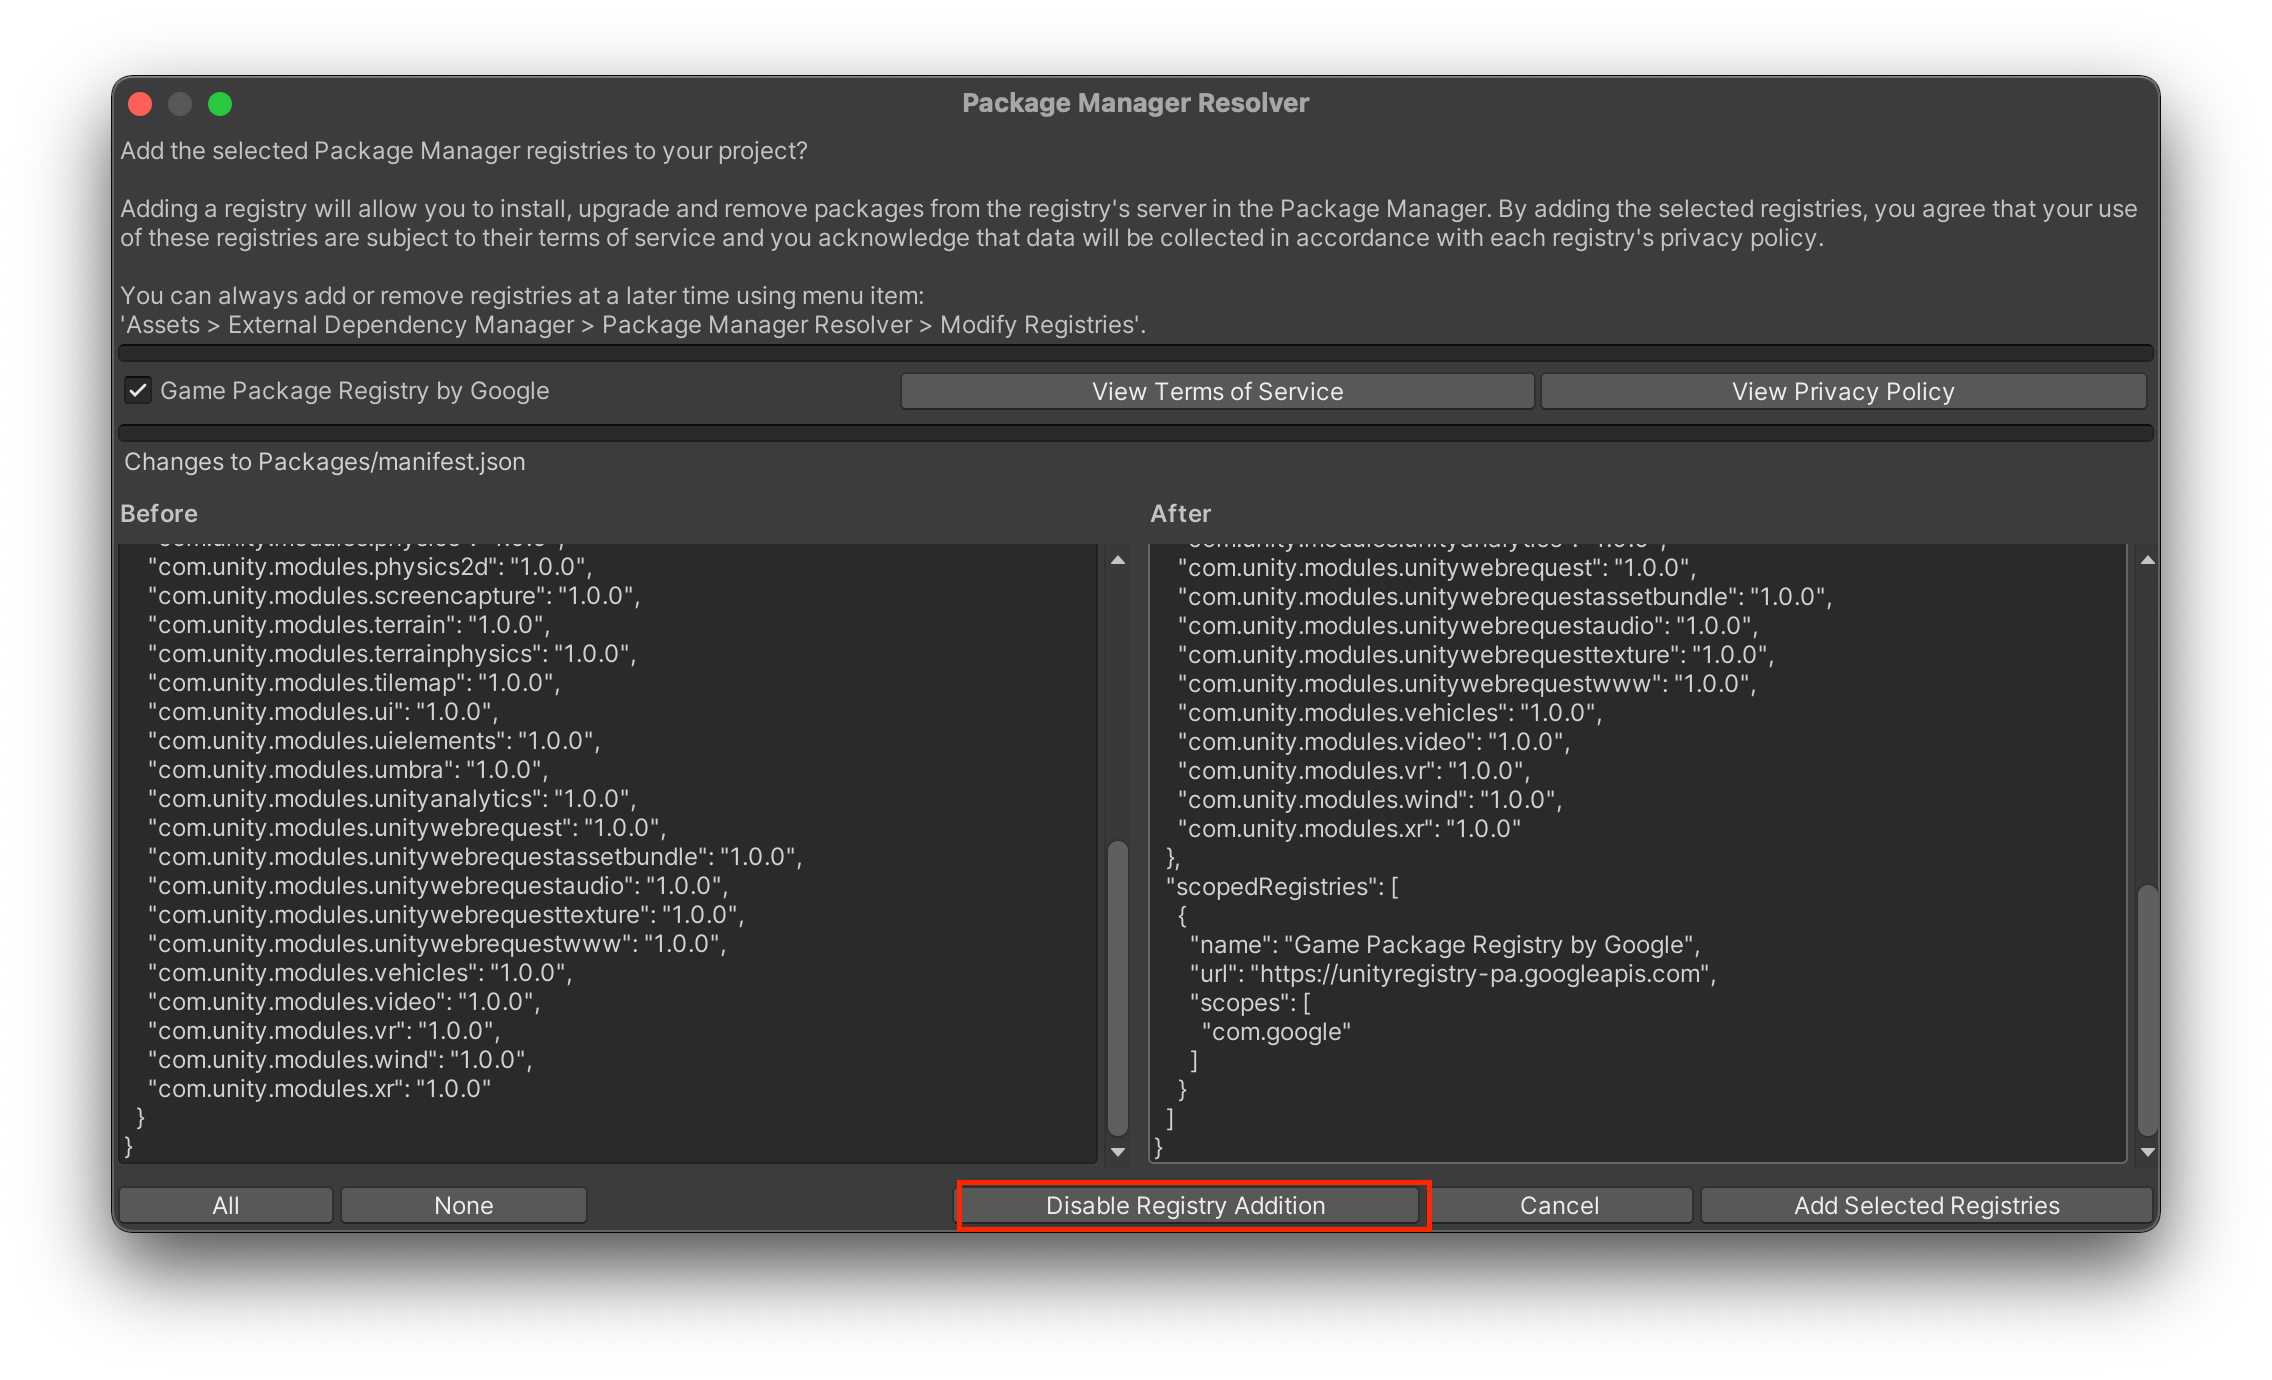
Skillz bundles a plugin by Google called the External Dependency Manager (EDM4U), which is used to resolve Android dependencies. On import of the Skillz SDK, EDM will display a dialog, similar to the screenshot below, to ask if you would like to add additional Unity Package Manager registries. Click the "Disable Registry Addition" button to dismiss the dialog.
Configure Your Game in Skillz Settings
Skillz has a dedicated settings window to configure your game. Access it from the Skillz > Settings menu item:
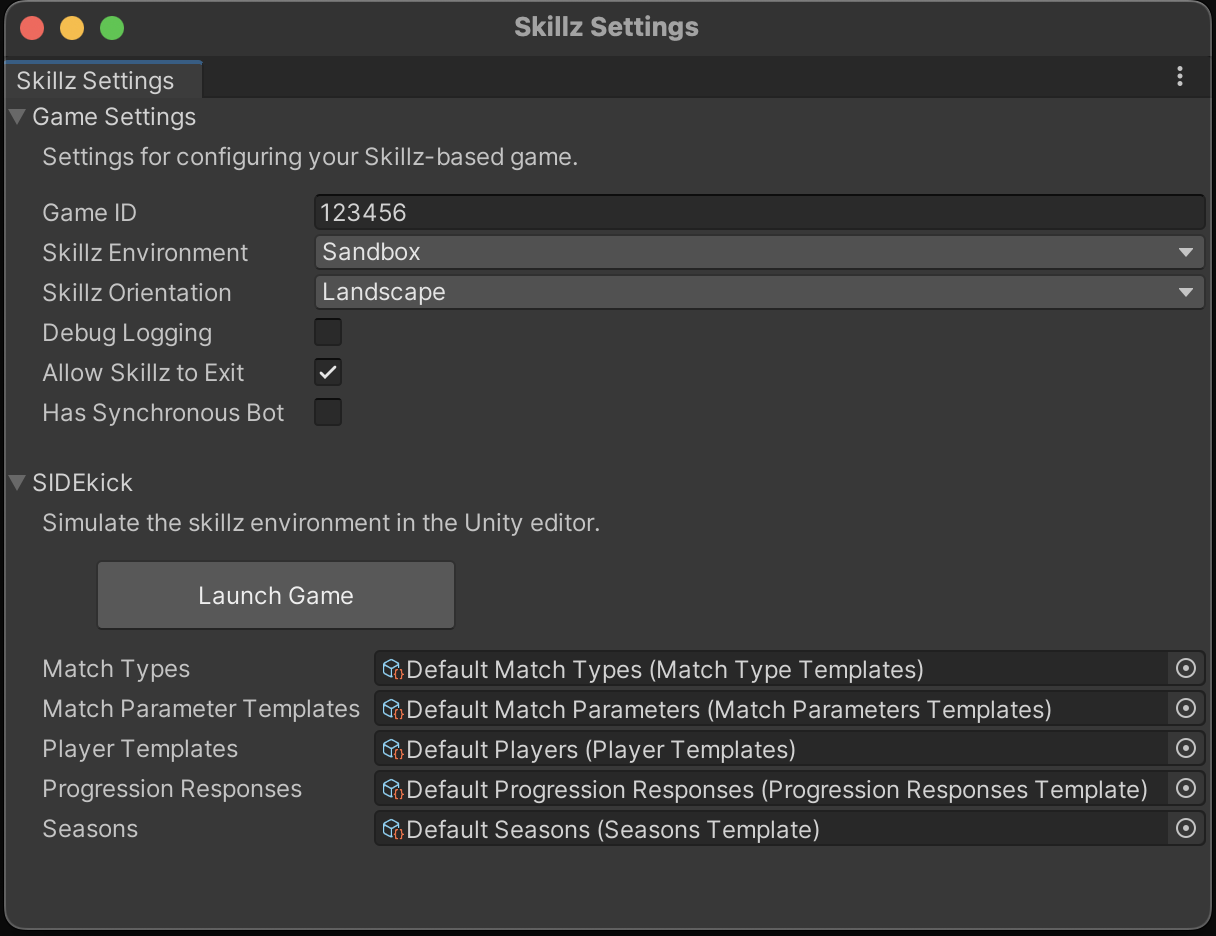
Enter your game ID, choose either Sandbox or Production for the environment, and your game's orientation for Android.
The orientation setting is for Android only. For games that have mixed orientations, the orientation setting tells Skillz what orientation to set your game scene at when it is loaded at the start of a match. For instance, if the scene for your main menu is designed for Portrait mode, but your game scene is designed for Landscape, the orientation setting should be set to Landscape.
Additionally, you can choose if users are allowed to exit the Skillz UI via its sidebar menu.
Configure iOS Resolver Settings
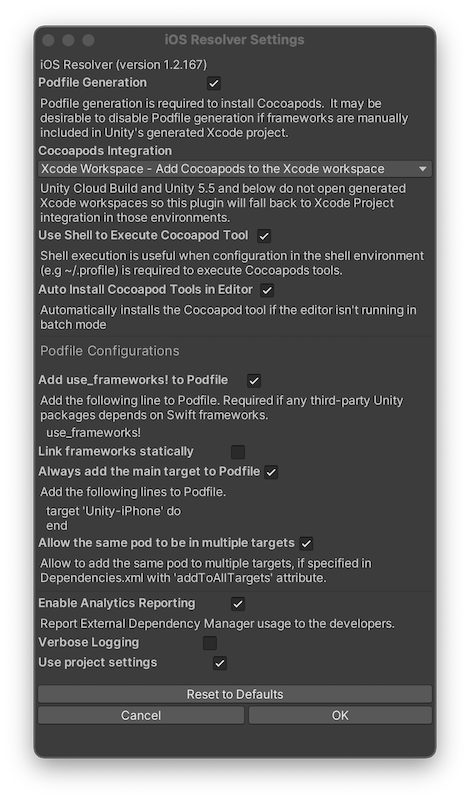
Enter the External Dependency Manager's iOS Resolver settings by clicking `Assets > External Dependency Manager > iOS Resolver > Settings. Verify the settings are set like this:
Install CocoaPods
The External Dependency Manager can install CocoaPods for you, if it is not already installed:
- Select
Assets > External Dependency Manager > iOS Resolver > Install Cocoapods - Click
OKin the pop-up confirming installation was successful.
Update Skillz Manager Extra Logic Scripts
If the Skillz Manager has been added to your project before upgrade, and the extra logic scripts are used, a small change is needed to the parameters of one of the extra logic script methods.
Previous OnMatchWillBegin method:
// ...
  public class SkillzExampleManagerLogic : MonoBehaviour
  {
    public void OnMatchWillBeginLogic()
    {
      Debug.Log("Loading Game Scene");
    }
 ...
New OnMatchWillBegin method:
// ...
  public class SkillzExampleManagerLogic : MonoBehaviour
  {
    public void OnMatchWillBeginLogic(SkillzSDK.Match match)
    {
      Debug.Log("Loading Game Scene");
    }
 ...
Add Skillz Manager
The legacy SkillzMatchDelegate flow is still valid, the new Skillz Manager can also be used for this purpose. Instructions on how to update this are below:
First, Please replace your call to SkillzCrossPlatform.LaunchSkillz(SkillzMatchDelegate delegate) with SkillzCrossPlatform.LaunchSkillz().
A Skillz Manager needs to be added to your start menu scene.
Right click in the
Heirarchyand selectCreate Empty. In the inspector, clickAdd Componentthen add theSkillz Managercomponent.Open the Skillz Manager in the Inspector.
Choose a
Game Scene,Start Menu Scene, and optionally aProgression Room Scenefor the scene fields.
NOTE: If your project does not use multiple scenes, or scenes need to be loaded manually, the scene fields can be left blank. The logic for these events can then be included in the extra logic script (see below).
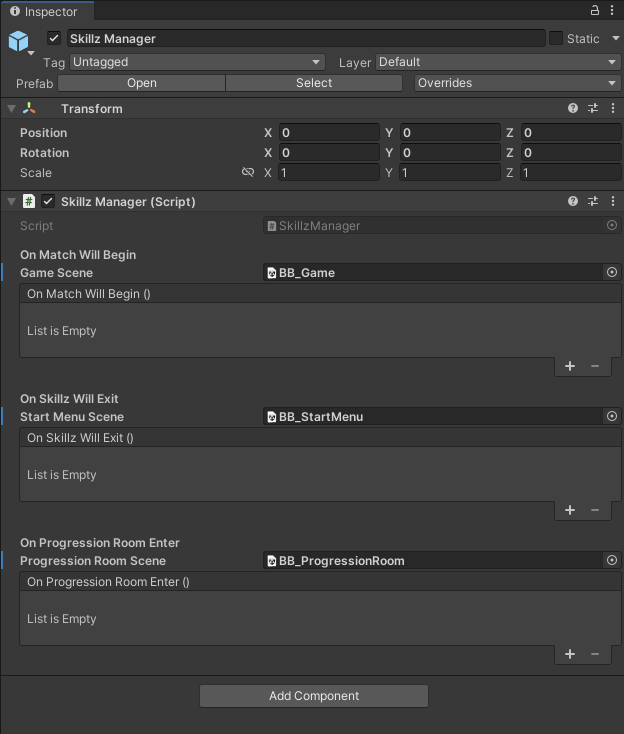
NOTE: If your project uses unsupported Unity version 2019 or lower the Skillz Manager will not display correctly. Solution Here.
- For additional logic you may add a script to the
Skillz Managerby selectingAdd Component, then selecting a custom script. The script must be on the same gameObject as theSkillz Manager.
Methods from this script can then be called by pressing the + button under the On Match Will Begin, On Skillz Will Exit, and On Progression Room Enter, then selecting public methods from the added script.
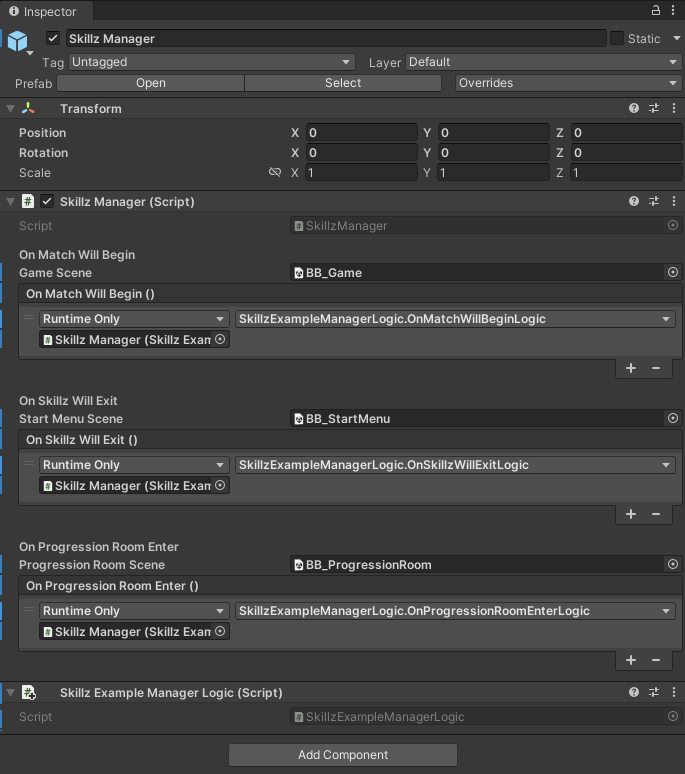
An example extra logic script:
// ...
  public class SkillzExampleManagerLogic : MonoBehaviour
  {
    public void OnMatchWillBeginLogic(SkillzSDK.Match match)
    {
      Debug.Log("Loading Game Scene");
    }

    public void OnSkillzWillExitLogic()
    {
      Debug.Log("Loading Start Menu Scene");
    }

    public void OnProgressionRoomEnterLogic()
    {
      Debug.Log("Loading Progression Room Scene");
    }
  }
// ...
Test Your Game's Workflow
Test your game's workflow with Skillz using the SDK's SIDEkick feature.
Build Your Game
Follow the instructions on how to export and build your game for iOS or Android.
Versions 29.x+ of the SDK require Gradle 6.5+, while Unity comes with Gradle 6.1.1. Android Studio should direct you to upgrade Gradle when you import the project. If you wish to build the apk from Unity directly, you can find directions on updating Unity's version of gradle here
Instructions
Re-Add Skillz.framework
Please download the newest Skillz.framework from the Skillz Developer Console. Next, remove the older version of Skillz.framework from your project. Now, add the Skillz.framework file that was downloaded to your Xcode project. Refer to this article for more information.
Update the Deployment Target
Now, update the deployment target to iOS 12.0.
Instructions
Add a Skillz SDK Dependency
Point your app to the Skillz SDK version 29.x. In your build.gradle file, update your Skillz dependency to the latest SDK version. For example:
android {
    dependencies {
        implementation 'com.skillz.sdk:skillz-sdk-android:29.1.35'
    }
}
Reference Gradle 6.5+
If you plan on using Google's Maven repository, Gradle version 6.5 and above is required. As such, you will need to modify our build.gradle file to reference v4.0.0 (or above) of the Gradle plugin. It usually resides in the buildscript section:
buildscript {
    dependencies {
        classpath 'com.android.tools.build:gradle:4.0.0'
    }
}
Refer to the official documentation to see which version of the plugin to reference for a different version of Gradle.
Change minSdkVersion, targetSdkVersion, and compileSdkVersion
You will need to modify your build.gradle file so that the minSdkVersion is 24, targetSdkVersion is set to 30, and compileSdkVersion is set to 31:
android {
    compileSdkVersion 31
    defaultConfig {
        minSdkVersion 24
        targetSdkVersion 30
    }
}
Update multidex-keep.txt
The Skillz SDK needs a few classes to end up in your APK's main DEX file upon compilation. Modify build.gradle to reference a file called multidex-keep.txt inside the defaultConfig subsection for the android section.
android {
    defaultConfig {
        multiDexKeepProguard file('multidex-keep.txt')
    }
}
Now, update the multidex-keep.txt in your Android Studio project with the contents below:
-keep class com.google.firebase.crashlytics.** { *; }
-keep class timber.log.** { *; }
-keep class com.facebook.FacebookSdk
-keep class com.path.android.jobqueue.JobManager
Enable AndroidX and R8
The Skillz SDK depends on the AndroidX Support Libraries instead of the original Android Support Libraries. Additionally, R8 has replaced Proguard as the standard tool for code shrinking, desugaring, and obfuscation.
In your project, add the lines below to the gradle.properties file; create one if it does not exist. These will tell Android Studio to automatically migrate dependencies from any original Support Libraries to their AndroidX equivalents, and enable R8.
android.useAndroidX=true
android.enableJetifier=true
android.enableR8=true
Update Proguard rules
Skillz is now obfuscated and requires updated Proguard rules to prevent it from being re-obfuscated and shrunken. Otherwise, this will cause crashes and other problems at runtime. In your build.gradle, make sure minifyEnabled and shrinkResources are both set to false. Additionally, specify 'proguard-rules.pro' as your Proguard file.
android {
    buildTypes {
        debug {
            jniDebuggable true
            minifyEnabled false
            shrinkResources false
            proguardFiles getDefaultProguardFile('proguard-android.txt'), 'proguard-rules.pro'
        }
        release {
            minifyEnabled false
            shrinkResources false
            proguardFiles getDefaultProguardFile('proguard-android.txt'), 'proguard-rules.pro'
        }
    }
}
Next, add the snippet below in your Proguard file:
# The Skillz Android SDK is already obfuscated, prevent it
# from being obfuscated again if minifyEnabled true
-dontobfuscate

# Prevent the Skillz SDK from being minified if minifyEnabled true
-dontshrink

-keep class bitter.jnibridge.* { *; }
-keep class com.unity3d.player.* { *; }
-keep class org.fmod.* { *; }
-keep public class com.dylanvann.fastimage.* { *; }
-keep public class com.dylanvann.fastimage.** { *; }
-keepclassmembers enum * {
    public static **[] values();
    public static ** valueOf(java.lang.String);
}
-keep class retrofit.** {*;}
-keep class com.facebook.** {*;}
-keep class com.amazonaws.** {*;}
Next Steps
If you encounter any problems, please contact us with a detailed description of the issue you are encountering.